Quick answer
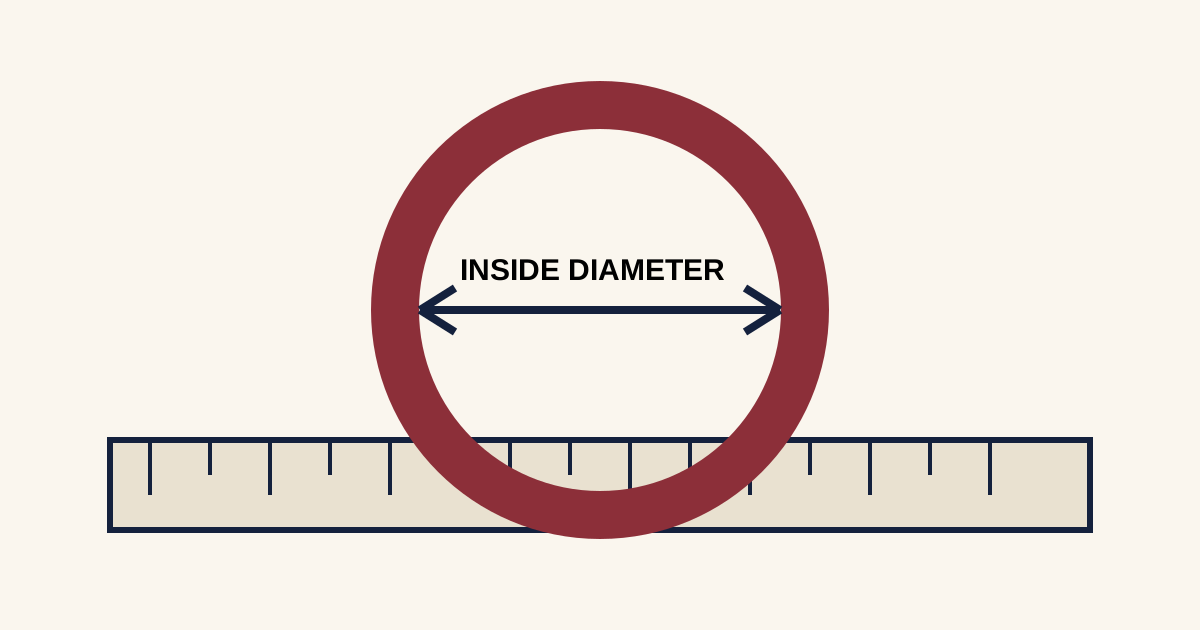
Measure straight across the widest part of the empty opening, from inner edge to inner edge. Exclude the metal and repeat after rotating the ring.
Choose the right reference ring
Use a ring that fits the intended finger on the intended hand. A ring from another finger can give the wrong result. Choose a plain, round ring. Oval, bent, adjustable or hinged rings do not offer one dependable diameter with a household ruler. Record the width and profile because a new wide band may feel different.
The useful test is physical and specific: use the intended finger and hand, keep the measuring tool level, and compare neighboring sizes rather than treating one rounded reading as exact. Write down the measurement in millimeters, the ring or gauge width, and the conditions. Those details let a jeweler or seller interpret the result for the actual design instead of working from a bare size label.
Measure inner edge to inner edge
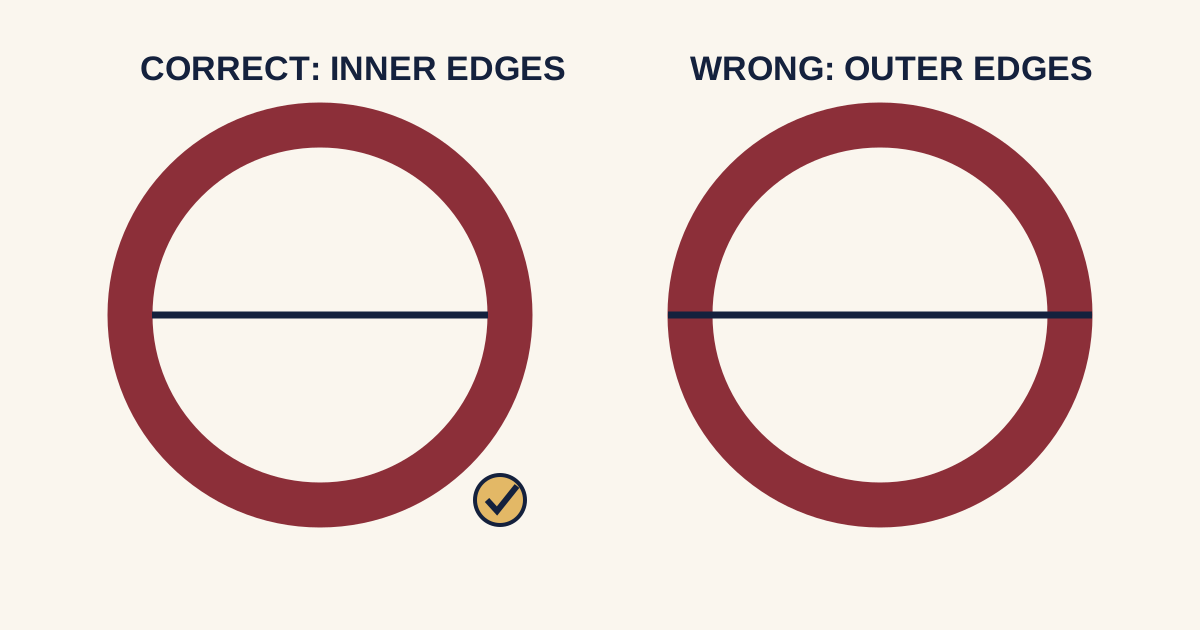
Lay the ring on a ruler marked in millimeters. Align one inner edge with zero and read the opposite inner edge at the widest line through the center. Ignore both metal walls. Look straight down to reduce perspective error. Repeat after rotating the ring ninety degrees. If readings disagree, ask a jeweler to assess whether it is out of round.
The useful test is physical and specific: use the intended finger and hand, keep the measuring tool level, and compare neighboring sizes rather than treating one rounded reading as exact. Write down the measurement in millimeters, the ring or gauge width, and the conditions. Those details let a jeweler or seller interpret the result for the actual design instead of working from a bare size label.
Convert diameter without false precision
The page tool searches the same dataset as the main calculator. Its nearest match is a starting point because chart values are rounded and maker tolerances vary. US 9 is near 19.0 mm in the shared chart and US 10 near 19.8 mm. Enter what you see, keep the decimal, and compare neighboring physical gauges when the result falls between rows.
The useful test is physical and specific: use the intended finger and hand, keep the measuring tool level, and compare neighboring sizes rather than treating one rounded reading as exact. Write down the measurement in millimeters, the ring or gauge width, and the conditions. Those details let a jeweler or seller interpret the result for the actual design instead of working from a bare size label.
Existing ring diameter tool
This tool does not store or transmit the entry. It selects the nearest row from the same shared ring-size dataset used by the main calculator, so this page cannot drift into a second conversion table.
Measurement basics that prevent avoidable errors
Ring size connects an inside circumference, an inside diameter, and a regional label. Circumference is the distance around the finger or inside of the ring. Diameter is the straight line through the center of a circular opening. The mathematical link is simple: diameter equals circumference divided by pi. The practical work is harder because paper stretches, rulers are read at an angle, fingers change, and manufacturers round their charts.
Use millimeters through the measurement and conversion process. Converting to a coarse fraction of an inch too early can erase the difference between neighboring sizes. If you begin with inches, multiply by 25.4 and keep at least one decimal place in millimeters. The chart may still show rounded values, so a calculated match should be checked with a physical gauge before an expensive order.
ISO 8653:2016 defines ring size measurement using a ring stick with specified characteristics and a corresponding finger-gauge set. The standard’s approach matters because the stick and gauge rings agree with one another. A printed page, phone display, household string, and unknown retailer chart do not automatically share that calibration. Home methods are useful for screening and cross-checking, not for pretending uncertainty has disappeared.
How to take a dependable finger measurement
- Confirm the exact finger and hand. The same finger on the opposite hand may not match.
- Use a narrow non-stretch strip or a calibrated finger gauge. Keep it in contact with the skin without pulling tight.
- Check the widest knuckle as well as the place where the ring rests. A ring must pass one and remain secure at the other.
- Record the reading in millimeters and repeat it from the beginning. Do not simply reposition the same mark until it agrees.
- Repeat on another ordinary day, then compare the candidate sizes with a sample that resembles the finished band.
GIA’s professional guidance says not to force a finger-sizing gauge over the joint. That is both an accuracy point and a safety point. A test ring that requires painful force is not proving the size; it is showing that the fit or method needs to change. Stop for numbness, tingling, strong pain, marked color change, or fast swelling.
Band width, interior shape and manufacturing tolerance
Two rings with the same labeled size can feel different without either chart being fraudulent. A broad band contacts more skin than a narrow band. A convex interior concentrates contact differently from a flat interior. Thickness, edge radius, weight and balance add more differences. GIA directs professionals to wide-finger gauges for rings wider than 4 mm and discusses convex interiors separately.
This is why a fixed size-up or size-down rule is weak advice. The exact effect depends on the wearer and the model. Ask the maker whether its sample matches the production width and profile. If only millimeter dimensions are available, compare those dimensions with this site’s shared chart, then retain enough return or resize flexibility to correct the final fit.
Manufacturing also has tolerances. A finished ring can vary slightly from a display value, and international systems do not align at every half-step. Use regional conversions as close equivalents. The seller’s current chart and an actual sample take priority over a generic label when there is a conflict.
Temperature, activity and swelling
Measure when hands are comfortably warm and close to their normal resting state. Cold can make a finger feel smaller. Heat, activity, travel, prolonged stillness and other conditions can make it fuller. One unusually loose or tight moment should not determine a permanent ring. A short log across ordinary conditions is more informative than a single reading at a supposedly perfect hour.
The NHS lists prolonged positioning, salty food, some medicines, injury, temperature changes and circulation problems among possible reasons for swelling. Persistent or unexplained swelling belongs with a medical professional, not a larger chart size. Sudden, severe, painful, red or hot swelling, fever, chest symptoms or difficulty breathing calls for urgent assessment. This website provides sizing education and cannot diagnose a hand condition.
Common mistakes and why they fail
Using an average
A population or retail reference cannot identify an individual finger.
Wrong finger
Finger and hand differences make borrowed measurements unreliable.
Outside diameter
Including the metal overstates the empty opening.
One cold reading
Temporary conditions can make a normally secure ring seem loose.
Stacked rules
Adding for width and subtracting for comfort fit can double-count effects.
Early engraving
Personalization may remove simple return or exchange options.
Another mistake is assuming a phone screen is physically calibrated. Responsive layouts, browser zoom, display density, accessibility settings and screenshots can all alter scale. A screen tool should include a calibration check against a real ruler. Even after calibration, use it as a cross-check rather than the only evidence for a custom ring.
Decision checklist before you order
- The intended finger and hand were measured.
- At least two readings were taken under ordinary conditions.
- The knuckle and finger base were both considered.
- The sample or gauge resembles the finished width and inside profile.
- The seller’s current size chart was checked.
- Resize, exchange, return and engraving terms are understood.
- A professional has confirmed a valuable, custom or difficult-to-resize ring.
If one item is unknown, preserve flexibility. Order a sample, delay engraving, or speak with the maker. Good sizing does not mean inventing certainty; it means reducing the largest sources of error and leaving a sensible correction path for what remains.
Recheck the final candidate once more before purchase, using the same finger, hand, band style, and ordinary conditions recorded during fitting.
How to compare two candidate sizes
When a measurement lands between rows, keep both candidates in play. Put on the smaller gauge first only if it crosses the knuckle without force. Notice the pressure at the base, then remove it slowly. Repeat with the larger gauge under the same conditions. The smaller option may feel secure but become uncomfortable as the hand warms; the larger option may feel pleasant yet rotate or slip when the hand cools.
Compare function, not just ease. Hold the hand downward, open and close it, wash and dry it if the jeweler permits, and notice whether a heavy or asymmetrical ring turns. A well-chosen ring usually meets gentle resistance at the joint and rests without constant pressure. Short-lived skin compression can occur, but pain, tingling, numbness, color change or a deep persistent mark is not a target fit.
If each candidate solves only half the problem, changing the design may work better than changing the number. A different width, lighter top, rounded interior, tapered shank, hinged construction or professional sizing aid can address the conflict between knuckle clearance and base stability. Discuss these options before production because they affect cost, maintenance and future resizing.
Keeping a useful sizing record
Write more than the final size. Record the date, time, hand, finger, method, raw millimeter reading, gauge width, inside profile and the two neighboring sizes tested. Note whether the hands were unusually cold, warm, active or swollen. For an existing ring, add its width and two diameter readings taken after a quarter turn.
This record helps when a remote seller uses a different chart or when the delivered ring feels unlike the sample. Instead of saying that a size number seems wrong, you can compare the actual internal dimension and fitting conditions. Keep a screenshot or copy of the seller’s chart and policy from the order date, since product instructions can change.
Recheck rather than reuse an old measurement after a substantial change in the hand, an injury, a long interval, or a switch to a much wider design. Do not alter a ring to accommodate unexplained swelling before seeking appropriate medical advice. A clear record supports a calm correction; it is not a substitute for current fit.
What to bring to a professional fitting
Bring the intended ring details, including width, thickness, interior profile, material and any setting or inlay. If an existing ring fits, bring it too. Share the exact finger and hand, the home measurements, the times and conditions, and any difference between the knuckle and finger base. Mention if the size changes substantially or if swelling is under medical review.
Ask the jeweler to identify the gauge style used and to compare neighboring sizes. Try the sample long enough to notice edge pressure and rotation. Confirm the final internal dimension if the seller uses a proprietary label. For remote orders, ask whether a returnable production sample is available and who pays for a correction.
Frequently asked questions
Do I measure inside or outside?
Measure the inside opening only.
Can I use a ruler?
Yes, if it has clear millimeter marks and the ring is round.
What if the ring is oval?
Ask a jeweler; one household diameter is unreliable.
How accurate is the online tool?
It maps a good reading to the nearest chart entry; confirm the fit.
Can I measure from a photo?
Perspective and scale make photos less reliable than a physical measurement.
Sources and method
Dimensional matches on this page use the site’s single shared ring-size dataset. Diameter is derived from circumference using pi and displayed with practical rounding. Regional labels are close equivalents, not a claim that every maker uses identical tolerances.
- ISO 8653:2016, Jewellery — Ring-sizes — definition, measurement and designation using matched ring sticks and finger gauges.
- GIA Quality Assurance Benchmarks: accurate determination of finger and ring size — professional gauge, wide-band, joint and convex-interior guidance.
- NHS: swollen arms and hands — causes, self-care context and signs that need medical attention.
Editorial review: September 7, 2026. This educational guide is not medical advice and does not replace a jeweler’s model-specific fitting.